
After installing / Garuda apps
So you just installed Garuda and want to know how to proceed? Keep on reading! 😊
The Garuda Toolbox
Section titled “The Garuda Toolbox”To make all applications easily accessible, all important options are launchable using the Garuda Toolbox. To get an overview of the currently available settings, have a look at the picture below:
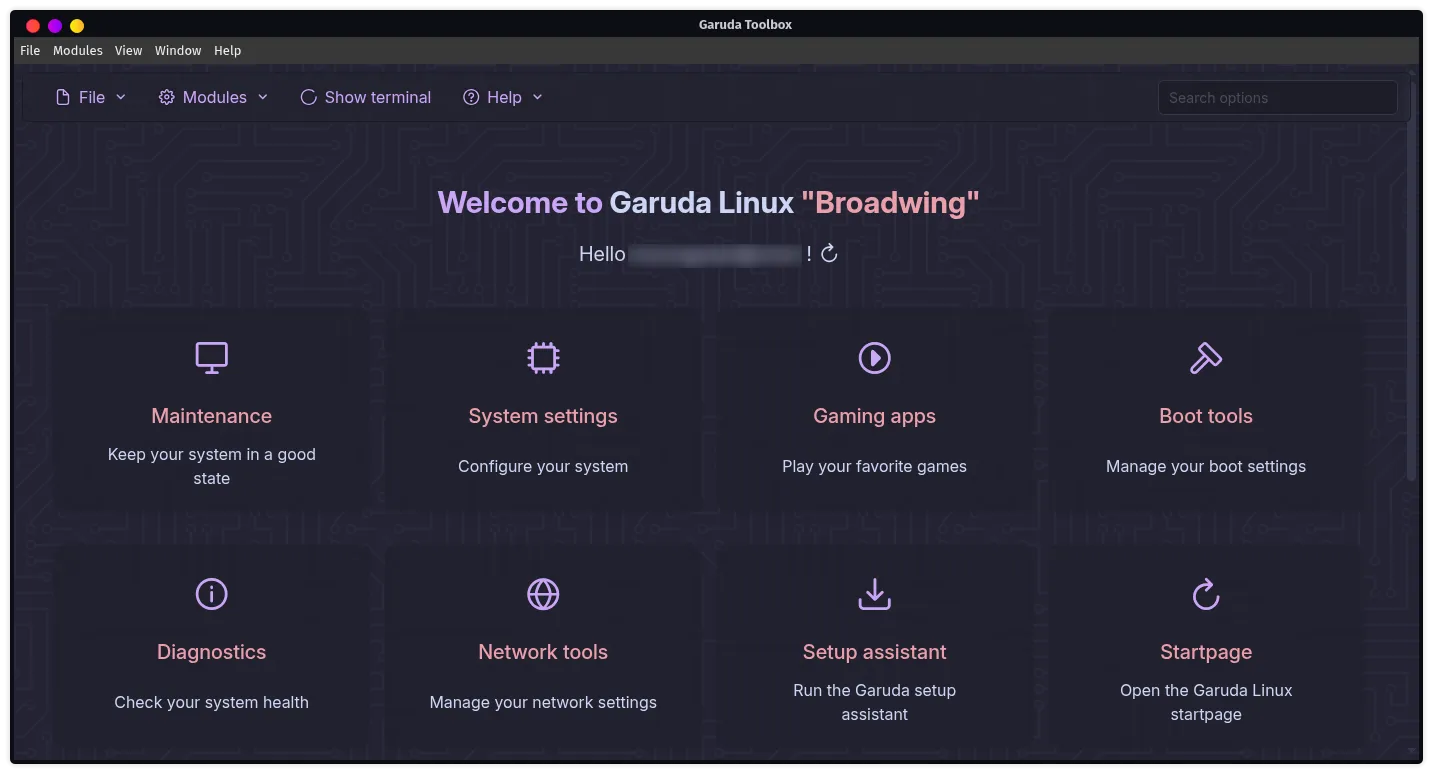
The application serves as a shortcut to our Garuda applications, web services, and other important system management tools. It is the place to go, if you want to:
- configure your system
- manage your settings
- keep your system healthy
Maintenance
Section titled “Maintenance”This is the flagship application of our distribution. Here, most of the system maintenance tasks can be performed by simply toggling the option. It can also easily show and copy logs of the system which are required in order to post a help request in our forum. Let’s have a look at what’s inside!
System maintenance
Section titled “System maintenance”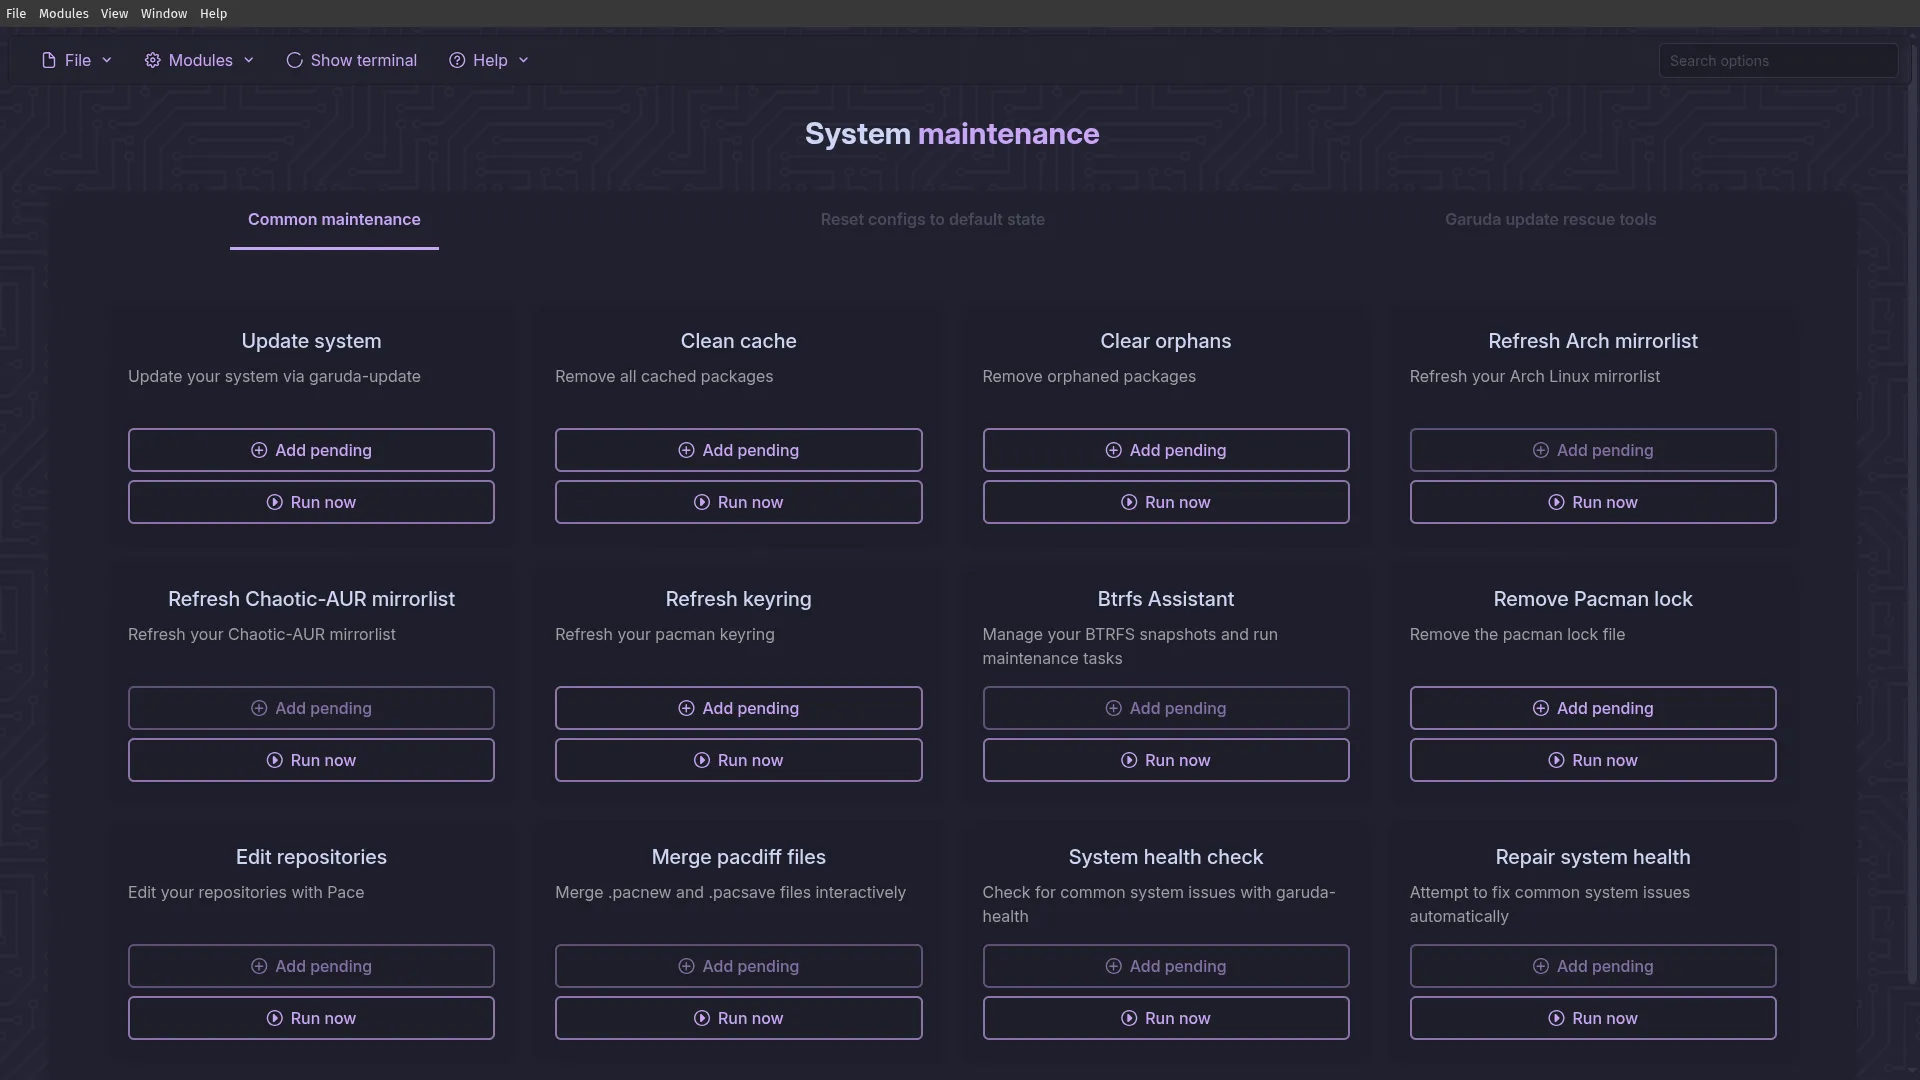
On this, we have package management related tasks (tab 1) as well as a convenient selection of applications that can get their settings to reset to default in case of issues with the current configuration (tab 2) or assist with update issues (tab 3). You could for example use this to:
- Update the system
- Refresh the mirror lists in case of bad download speeds during updates
- Refresh the keyrings if the update reports “invalid signatures”
- Remove the database lock if Pacman reports it is still running even though it is not (e.g. after an interrupted update)
- Remove orphan packages left behind after uninstalling a package
- Clear cache and package cache to get back storage space
BTRFS Assistant
Section titled “BTRFS Assistant”Initially, the BTRFS Assistant’s functions were integrated into Garuda Assistant. However, it eventually became its own application to also let other distributions profit from it. Let’s have a look at what it can do!
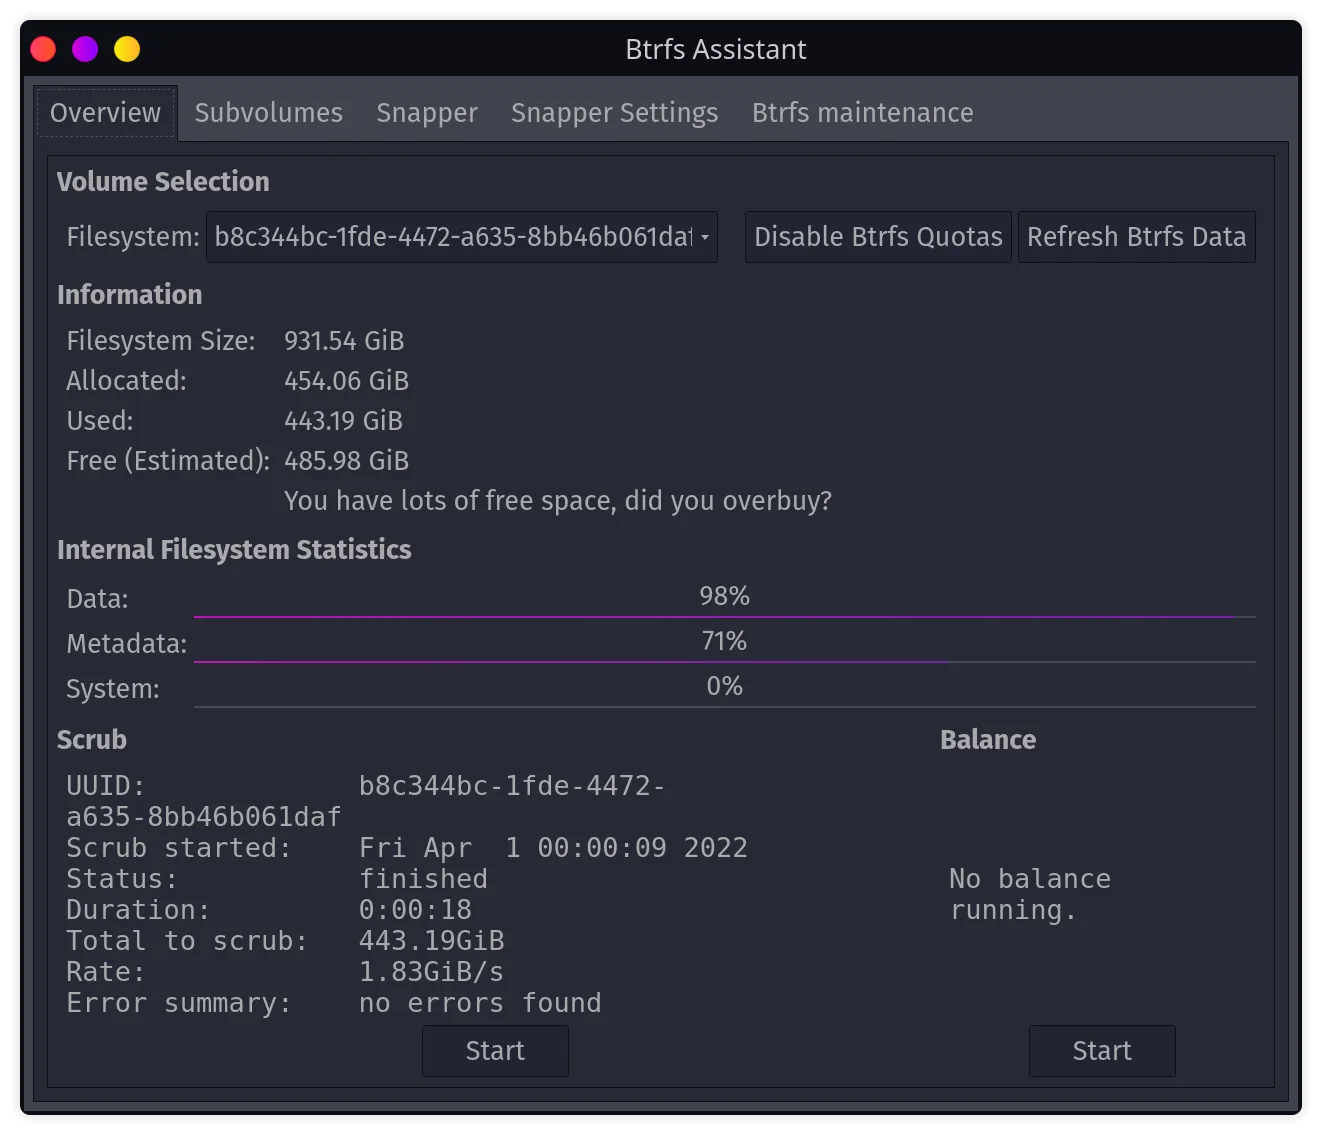
As you can see, this tab provides the most basic information about the filesystem like its size, and currently used storage space, and also recommends a BTRFS balance if needed. You can:
- Have a look at the actual filesystem usage and the estimated free space. It’s estimated only due to transparent compression.
- Check filesystem statistics and perform a full balance which might help if the system feels slow.
Subvolumes Tab
Section titled “Subvolumes Tab”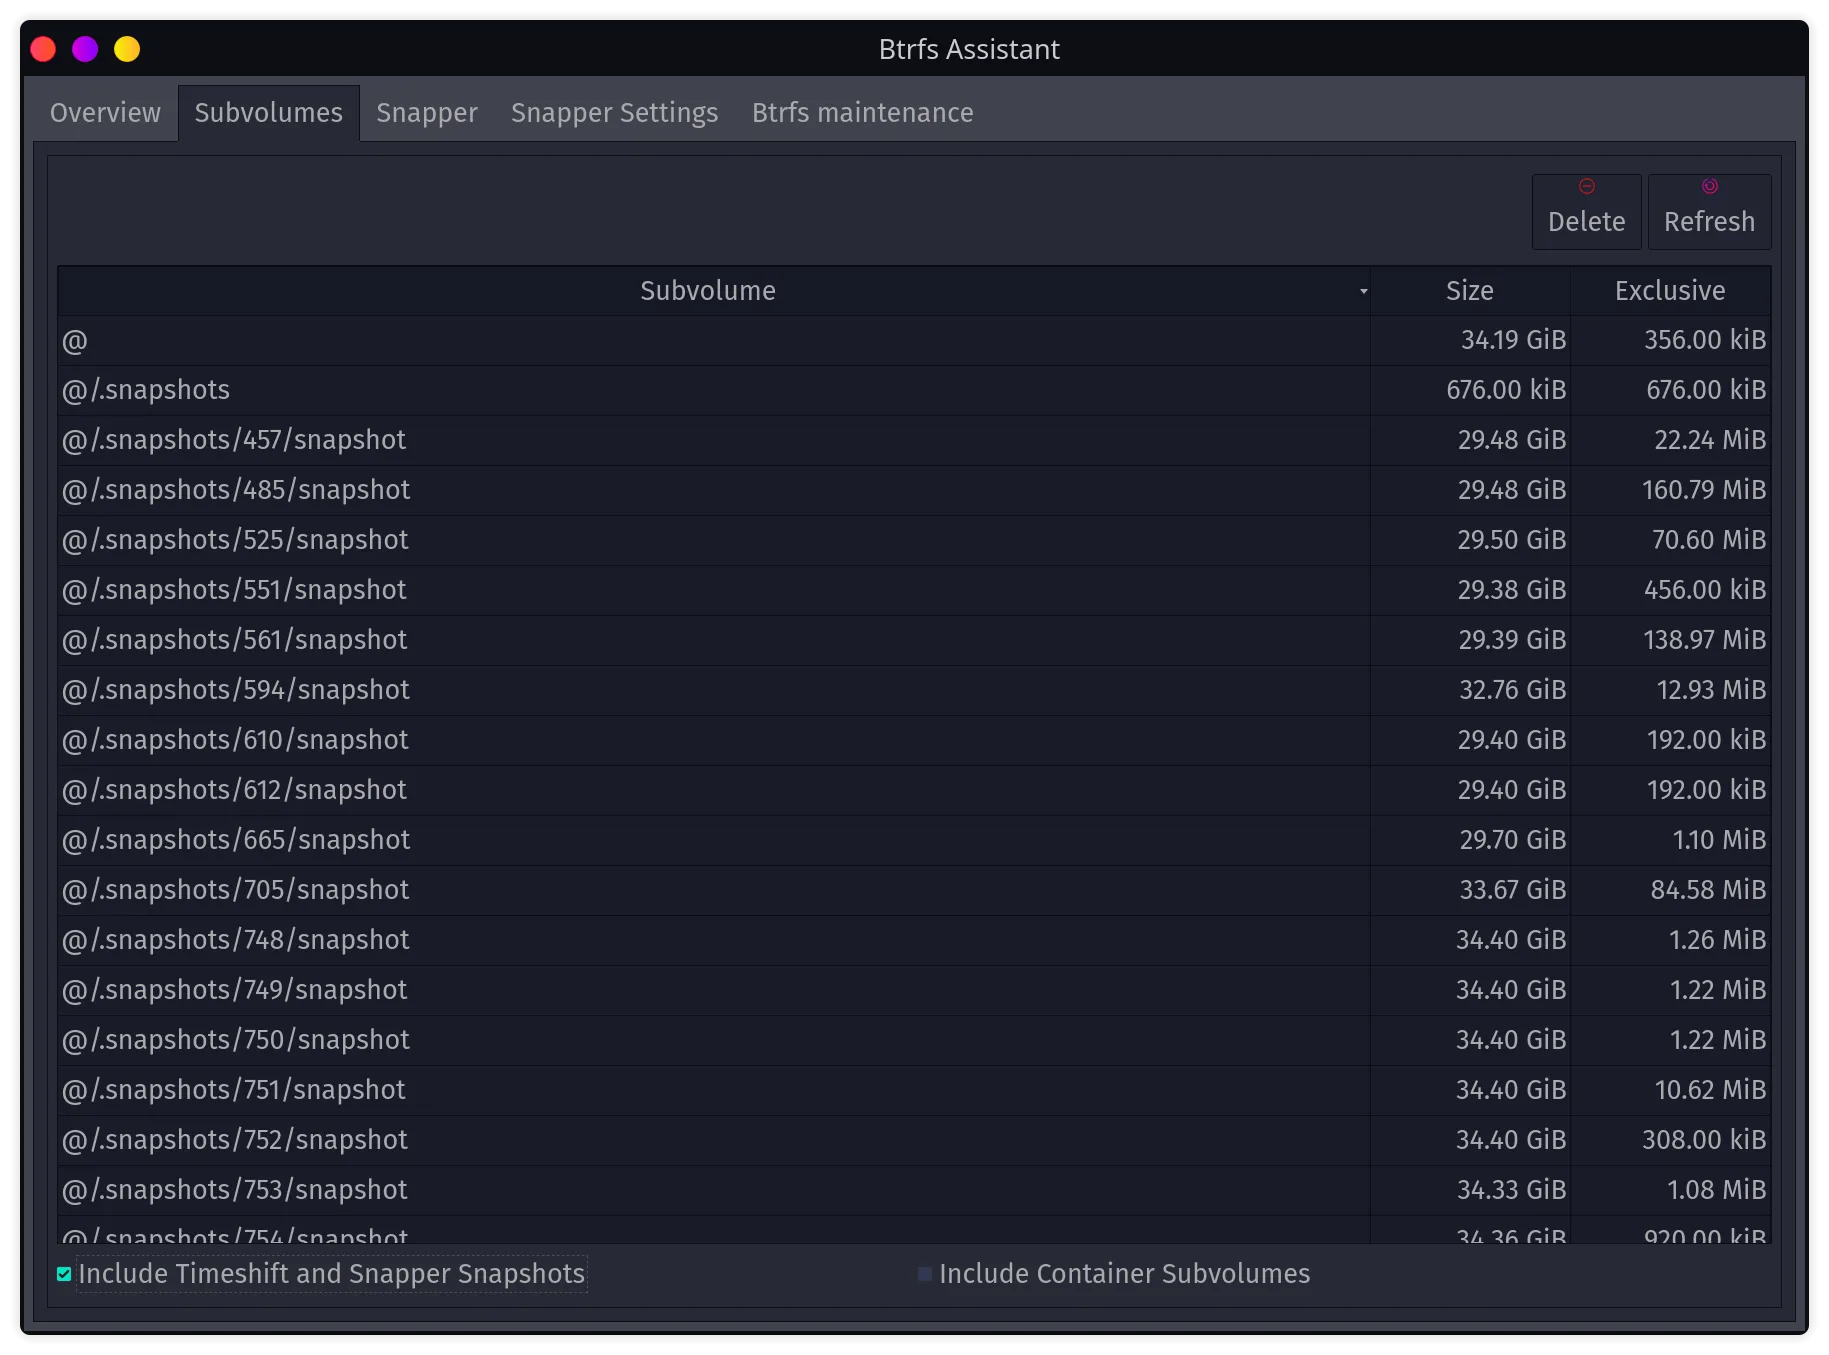
This tab shows all available BTRFS subvolumes. You can additionally show Snapper and Timeshift snapshots and delete subvolumes on demand.
Snapper Tab
Section titled “Snapper Tab”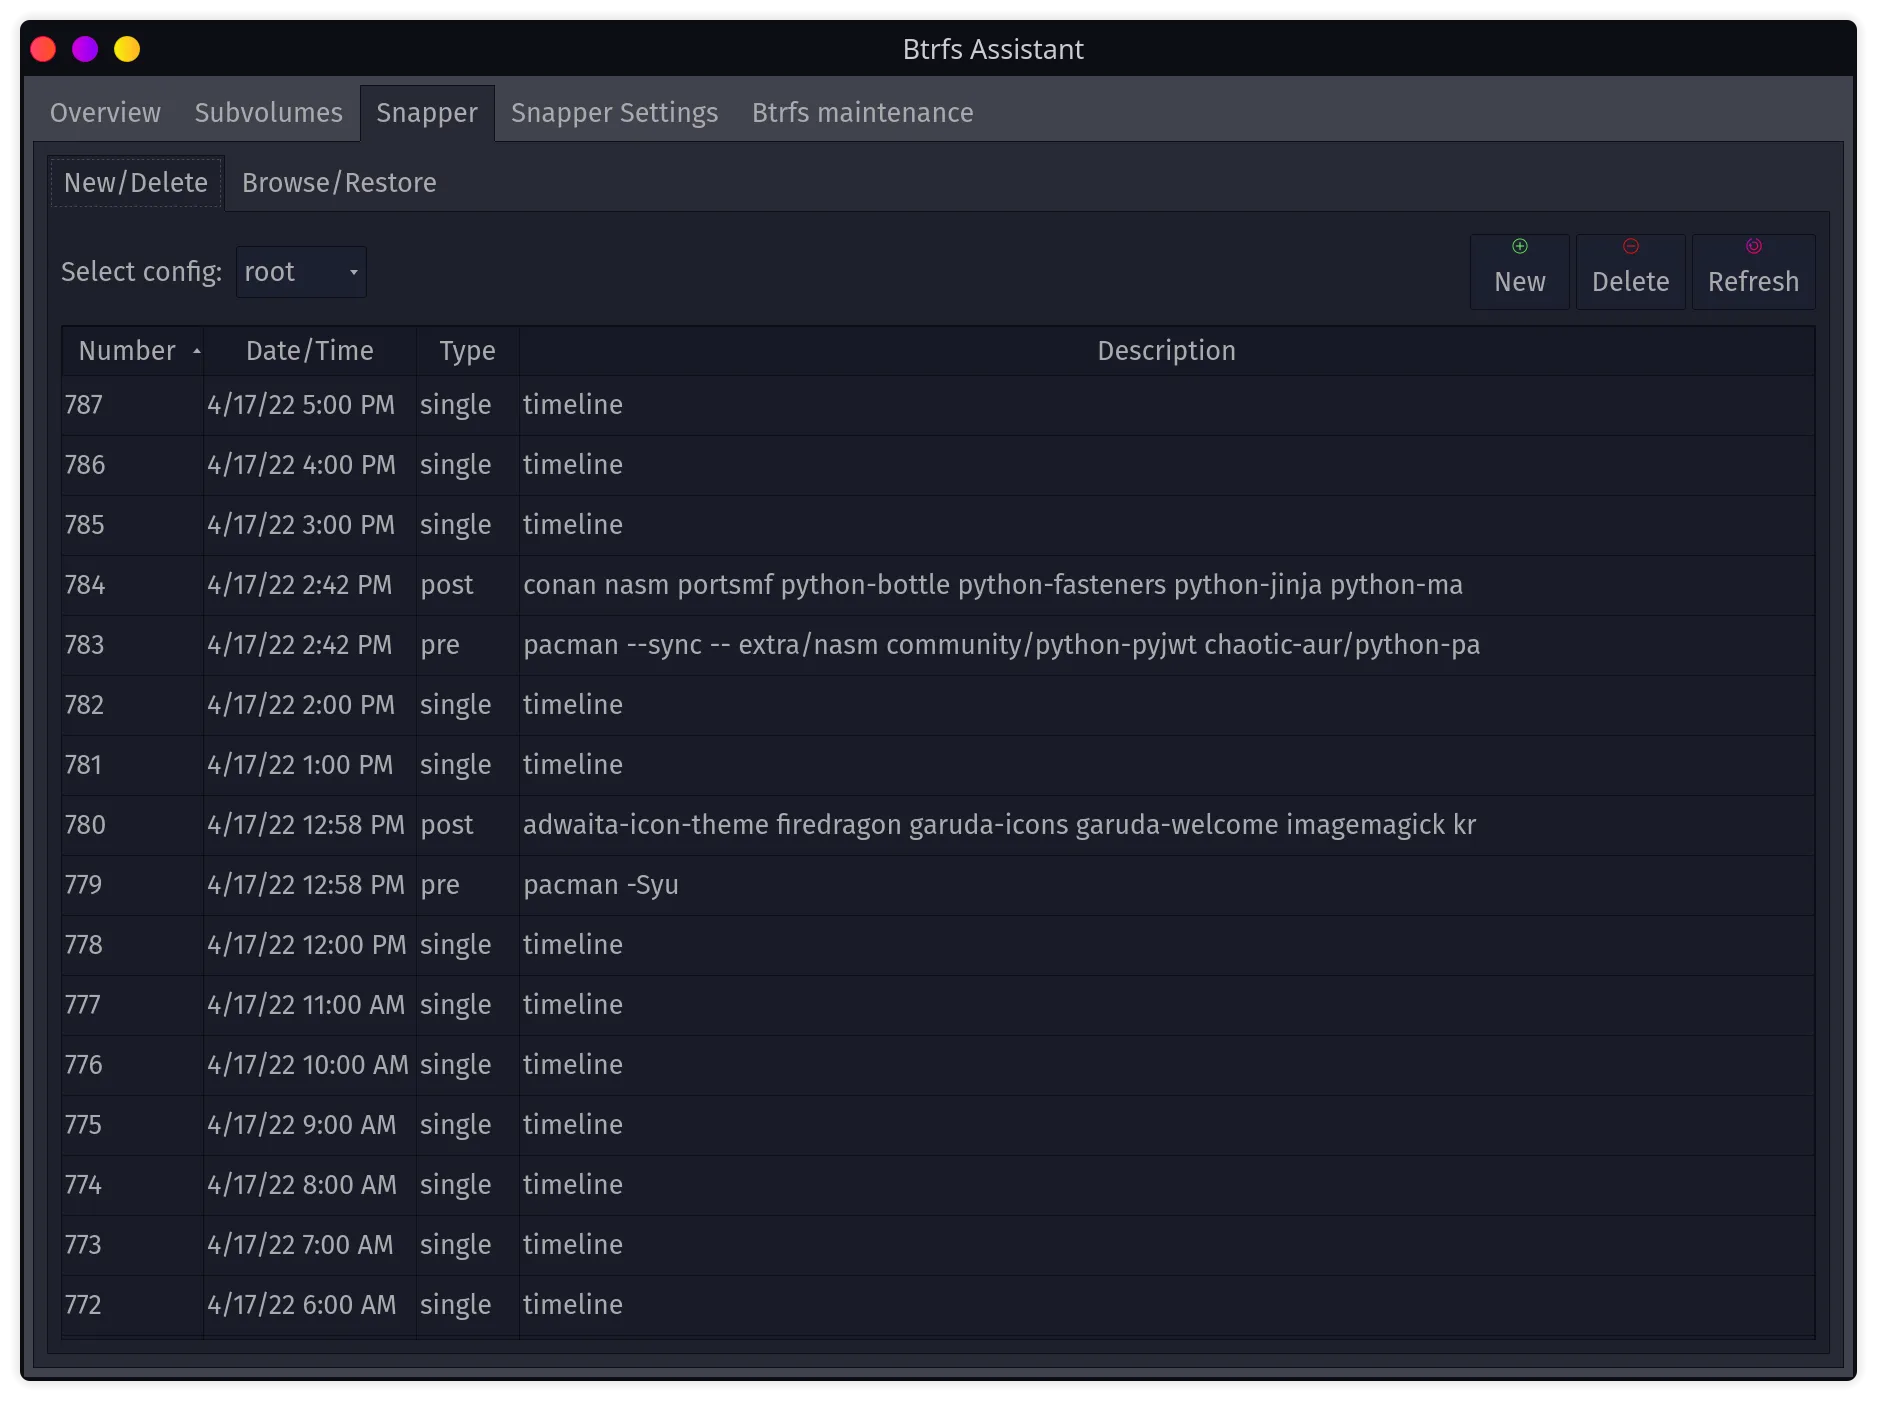
Here, all the available snapshots created by Snapper can be managed. Every snapshot will have a corresponding number, time of creation tag, and description which provides information about why a snapshot has been taken. It is also able to create new snapshots, delete obsolete ones and can - of course - restore them.
Restoring snapshots is as easy as:
- Boot into a snapshot via GRUB or use a live USB and open the application.
- Navigate to the Snapper tab and click enable “Restore Mode”
- Select a snapshot and click “Restore Snapshot”
- Finish by rebooting the device
Additional features
- Browse your Snapper snapshots
- Restore individual files from snapshots
Snapper Settings tab
Section titled “Snapper Settings tab”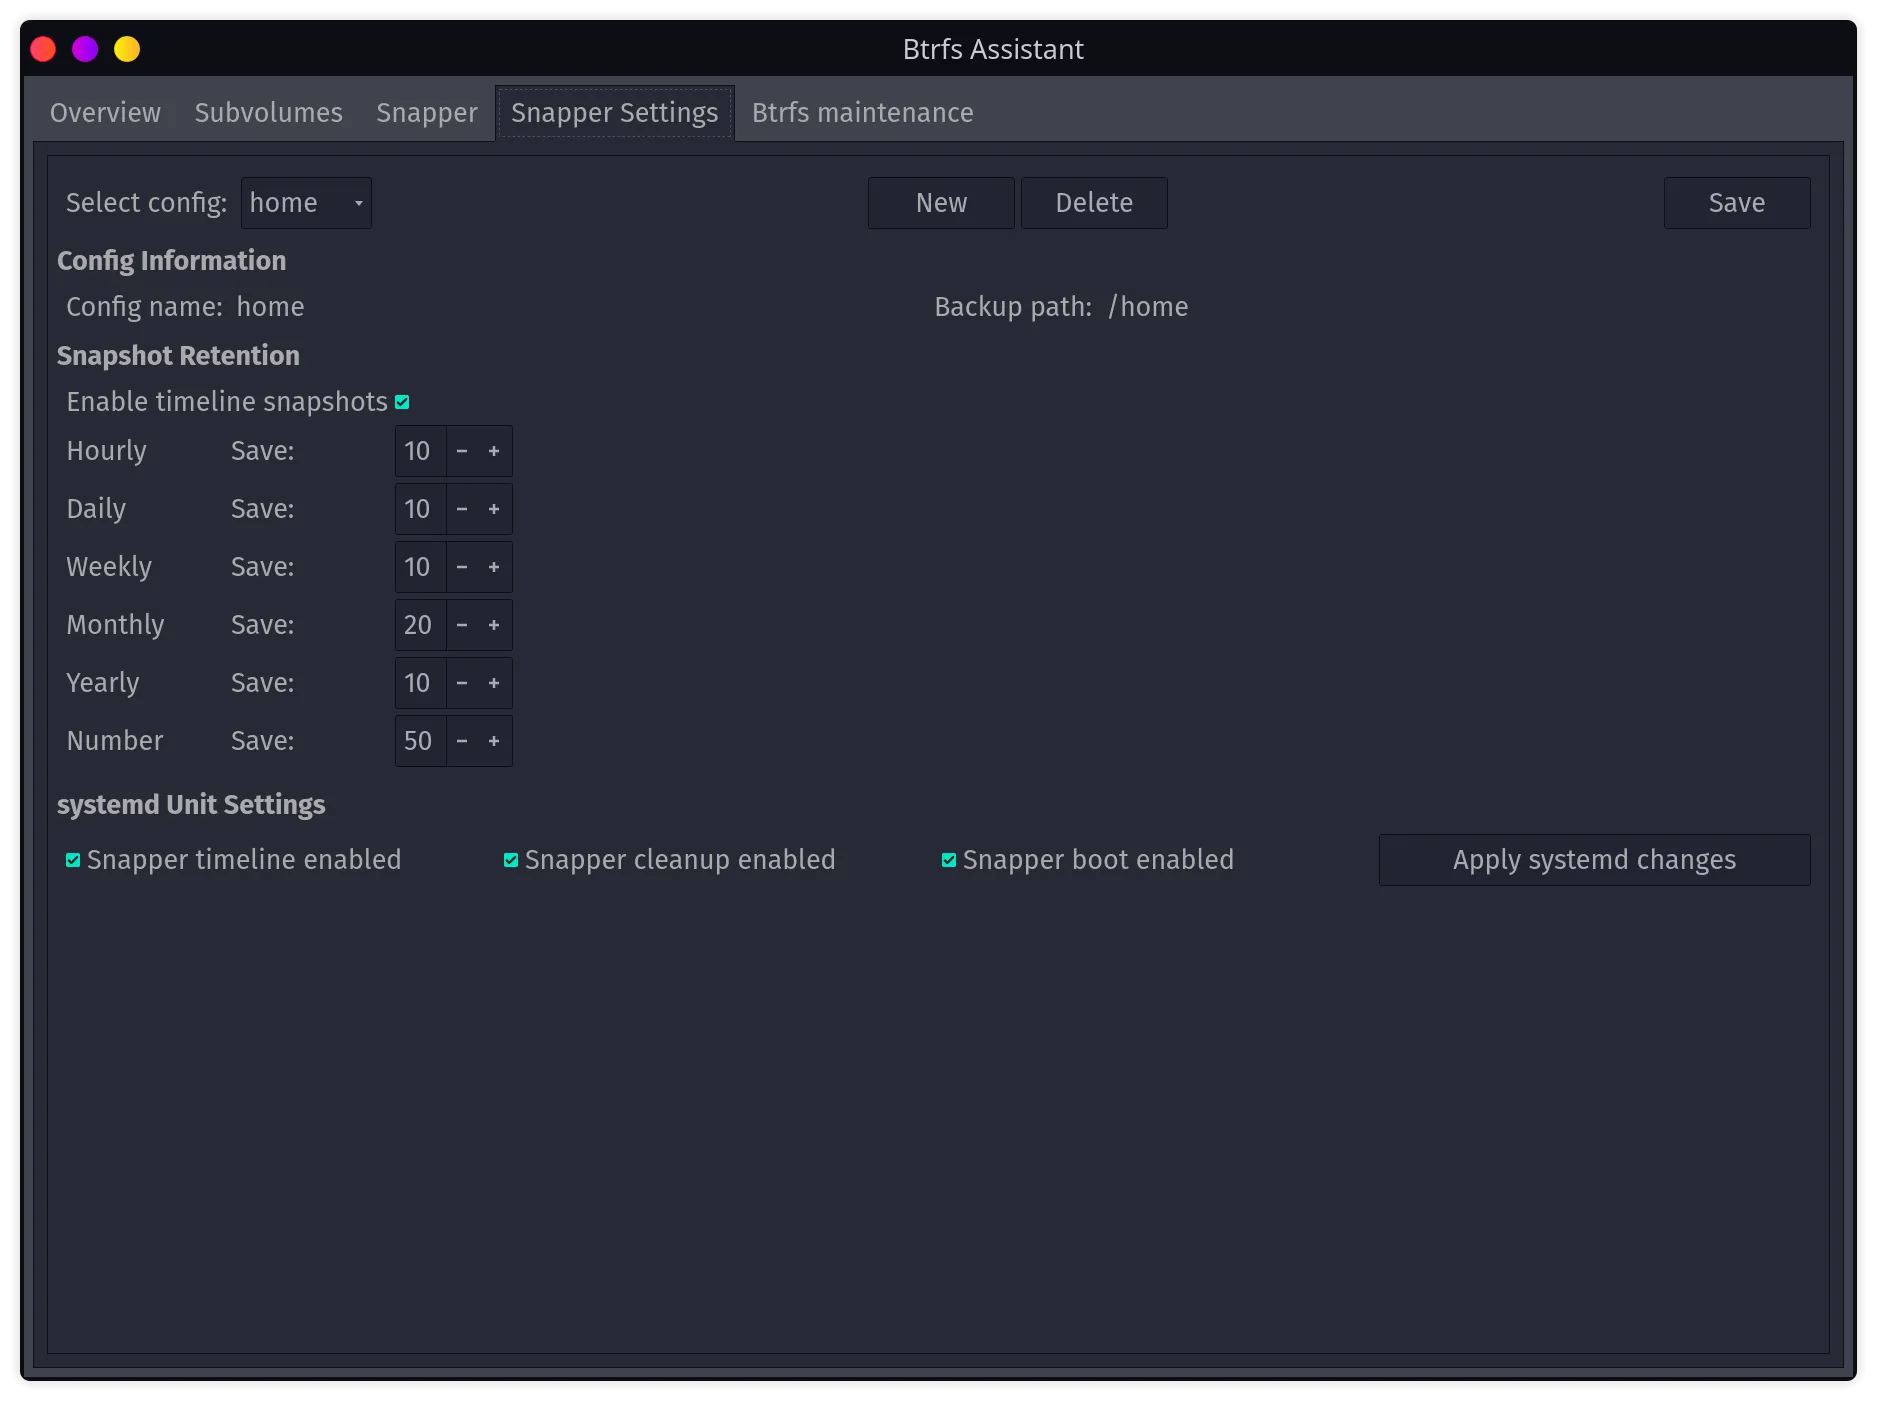
This tab provides an easy way to handle Snapper settings. You can
- Create or delete configurations for different subvolumes
- Control timeline snapshots - this can be useful to create regular snapshots apart from the ones taken before and after a package installation. Also, the amount of each individual snapshot can be controlled. If there are more than the preset number of snapshots, the Snapper cleanup timer will remove obsolete ones.
- Control Snapper timers - this concerns regular timeline (hourly, daily, etc.) and boot snapshots as well as the regular snapshot cleanup
Btrfs Maintenance Tab
Section titled “Btrfs Maintenance Tab”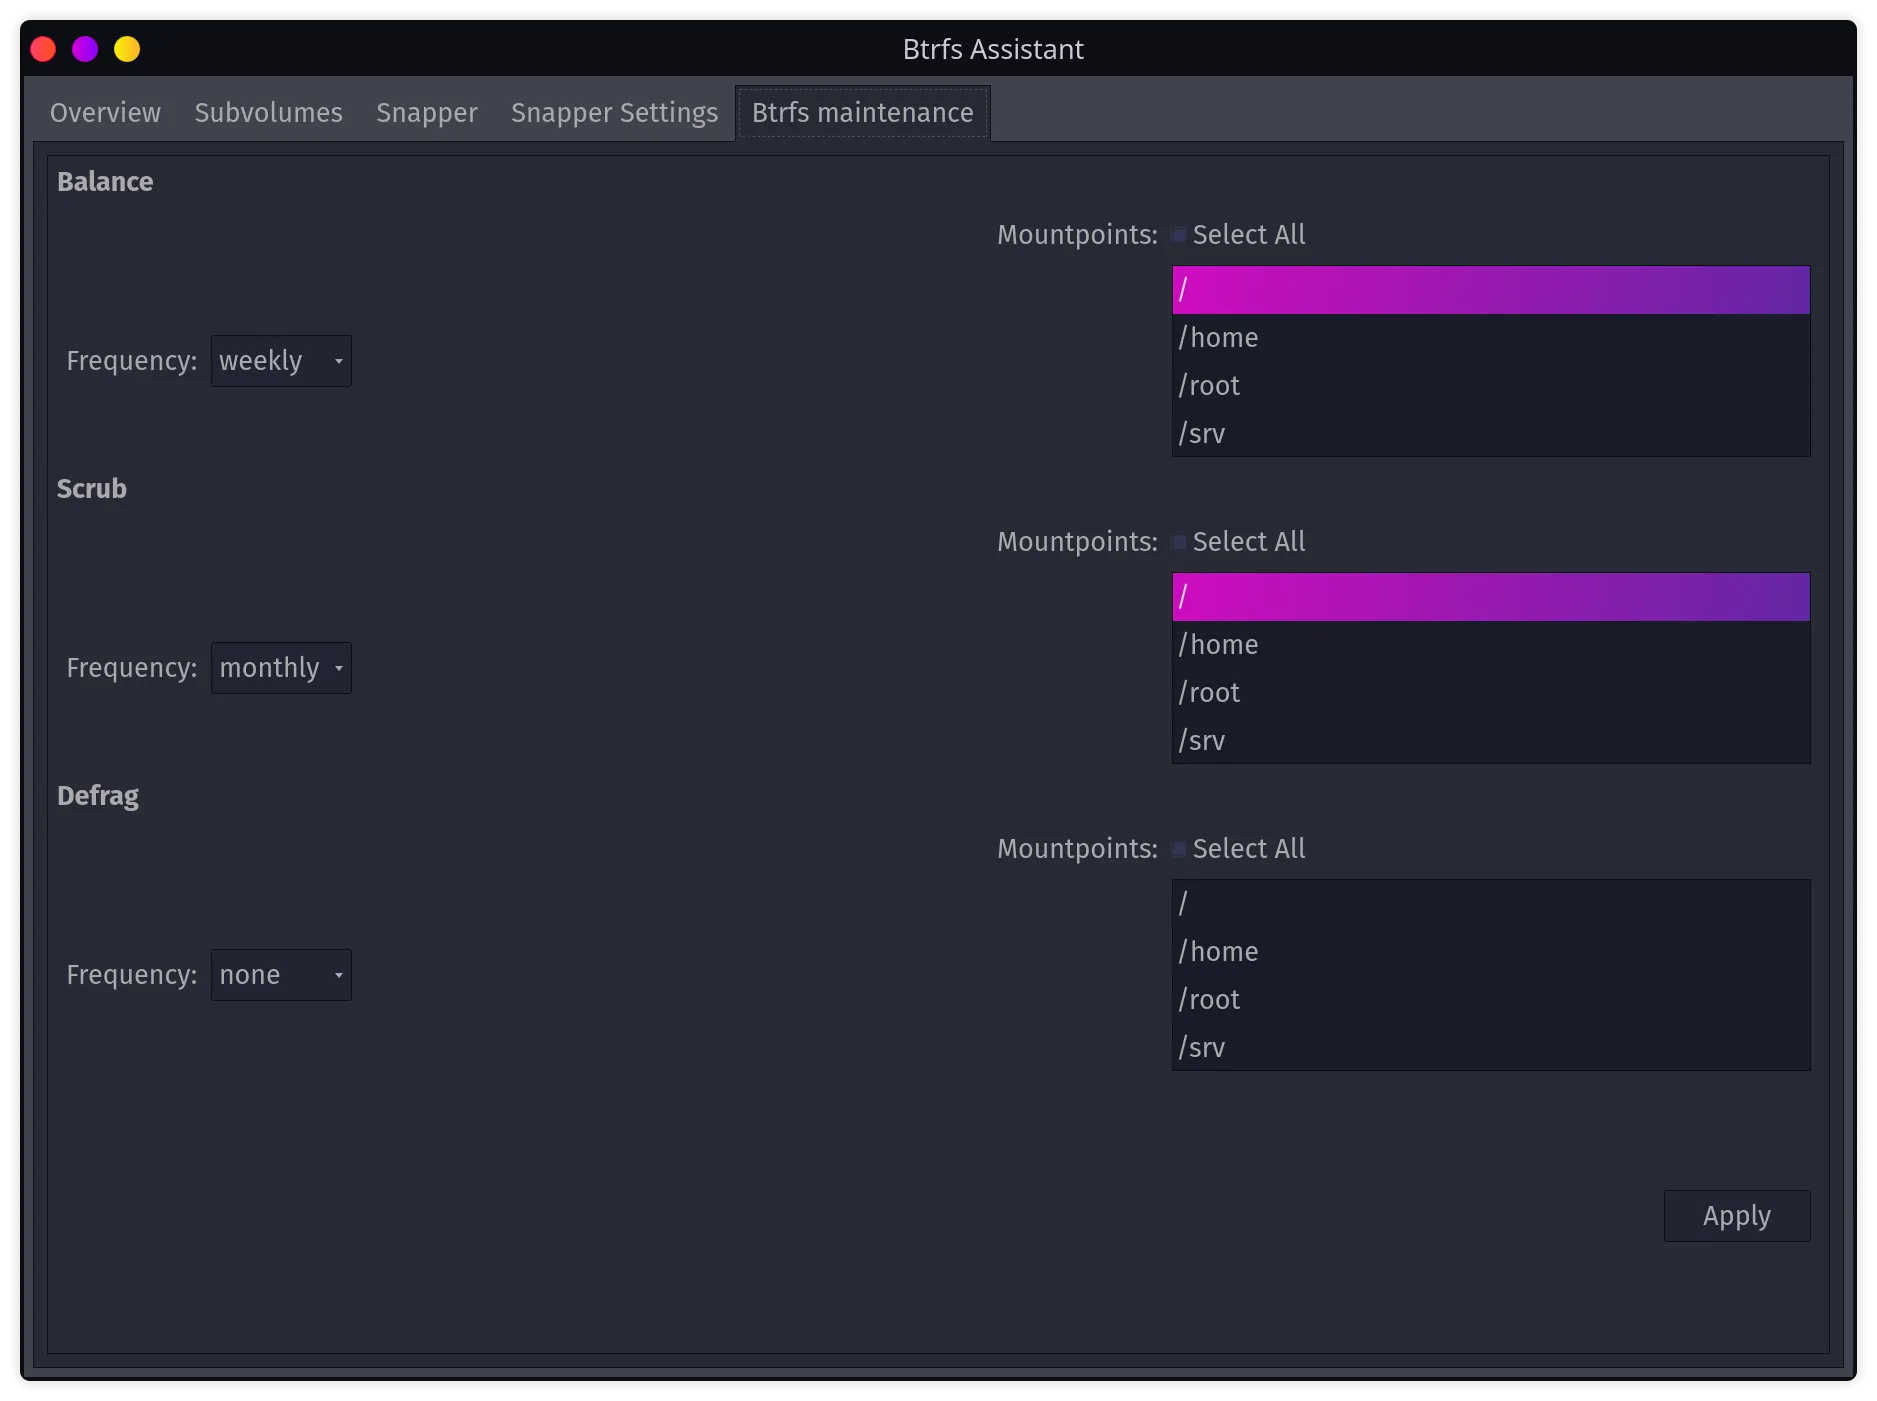
Control btrfs-maintenance-related timers - these provide the most basic maintenance tasks for the BTRFS filesystem and should usually be enabled
System settings
Section titled “System settings”System components tab
Section titled “System components tab”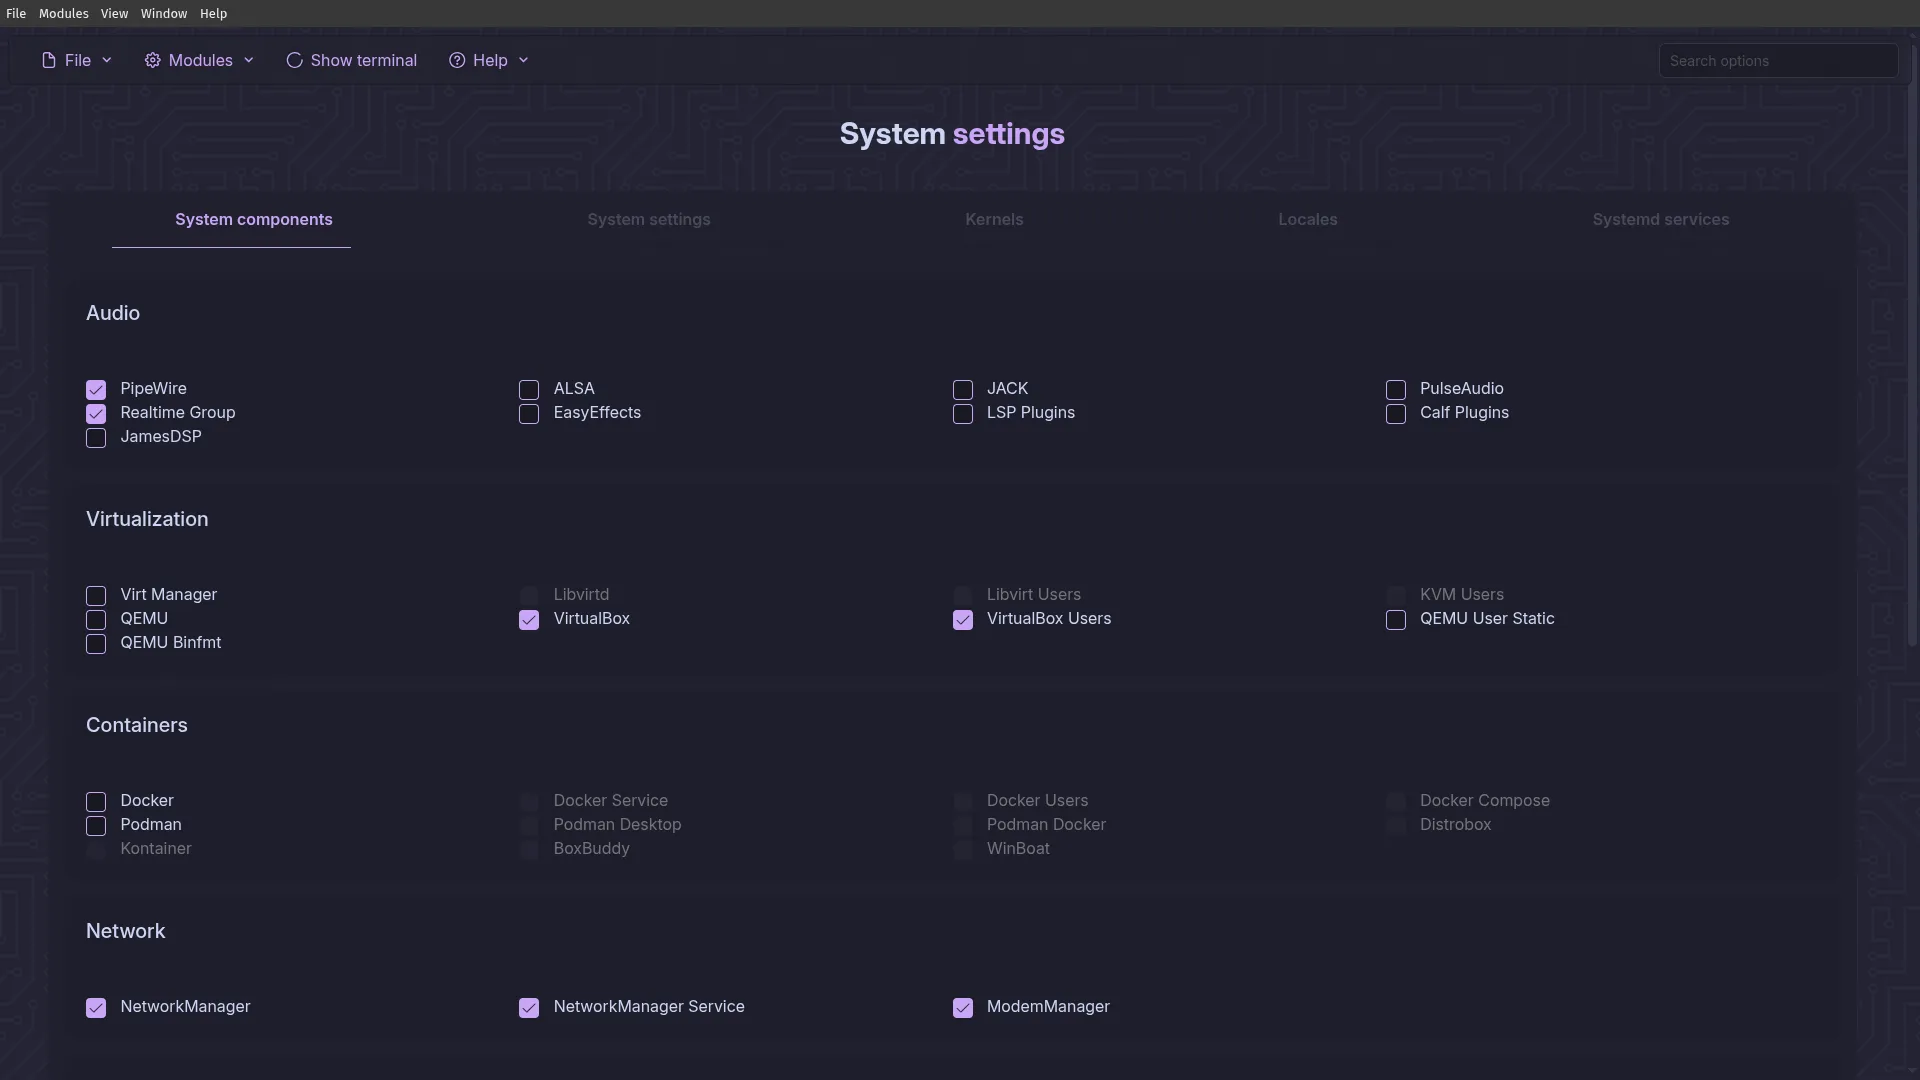
This tab is dedicated to enabling and disabling features and software support easily. Basically, this has multiple toggles:
- Install / remove a specific feature or application
- Enable / disable the service of an application
- Add / remove the user from a user group
For example, one could easily toggle support for printing and enable the firewall by selecting the concerning options and clicking “apply”. If you are unsure about what an option means, browsing the web for [option name] Arch wiki should provide an extensive explanation.
System settings tab
Section titled “System settings tab”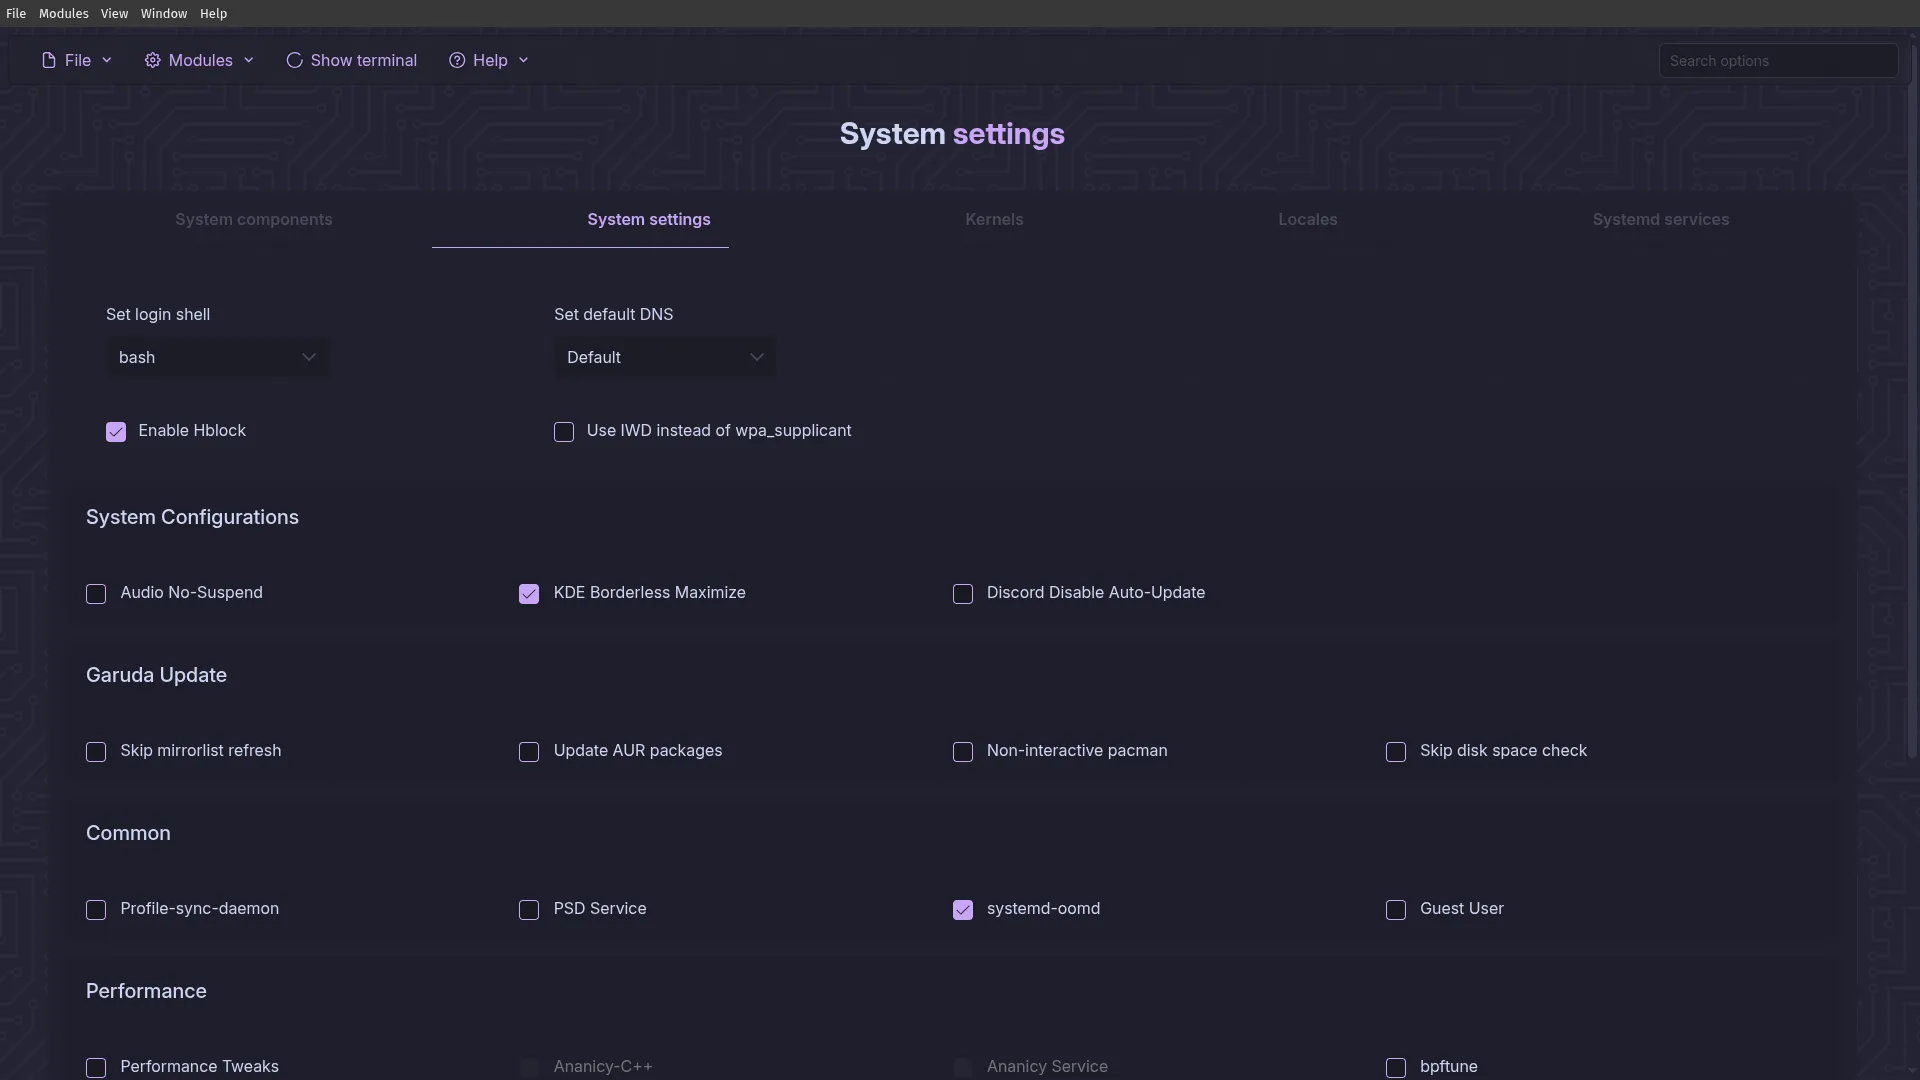
The system settings tab provides a simple interface to manage system settings and services easily. Unlike the components tab, it focuses on performance settings though. Possible use cases would be:
- Switching the default shell and installing default configs
- Choosing another DNS server to get rid of ads, as outlined in our privacy guide
- Enabling / disabling profile-sync-daemon (loads browser profile to RAM)
- Install either performance or power-saving tweaks depending on what is preferred
- Enable / disable further performance-related services
Here again, the hint that [option name] Arch wiki should provide an extensive explanation about the displayed actions.
Kernels, Locales, Systemd services, and Users & groups tabs
Section titled “Kernels, Locales, Systemd services, and Users & groups tabs”The last four tabs focus on providing a simple way of displaying relevant system information. These include:
- Kernels - shows available and active kernels and allows to view/edit default kernel settings
- Locales - view and edit available and installed locales, system wide language, and language packs
- Systemd services - provides an overview of Systemd services, that can be filtered and searched
- Users & groups - manage users and their group memberships
Gaming apps
Section titled “Gaming apps”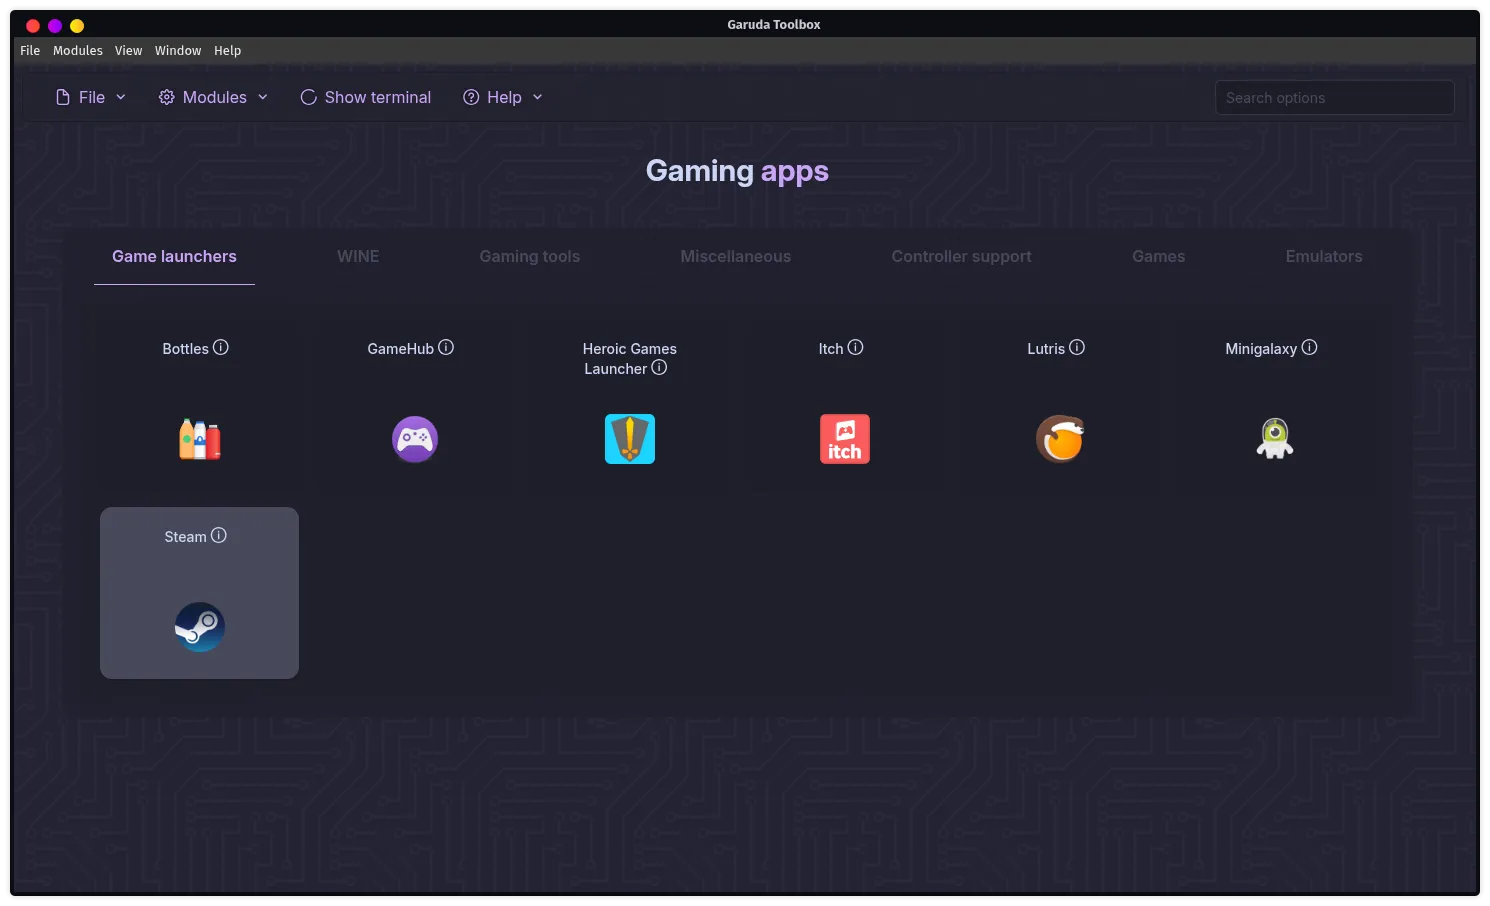
On this, we have categories all related to gaming on Garuda Linux. Here you can install or remove:
- Game launchers like Steam or Lutris
- WINE components
- Gaming tools, e.g. SteamTinkerLaunch
- Miscellaneous stuff like OpenRGB or Polychromatic
- Controller support for PS and XBox controllers
- Games (surprise, surprise)
- And last but not least emulators such as Dolphin
Boot tools
Section titled “Boot tools”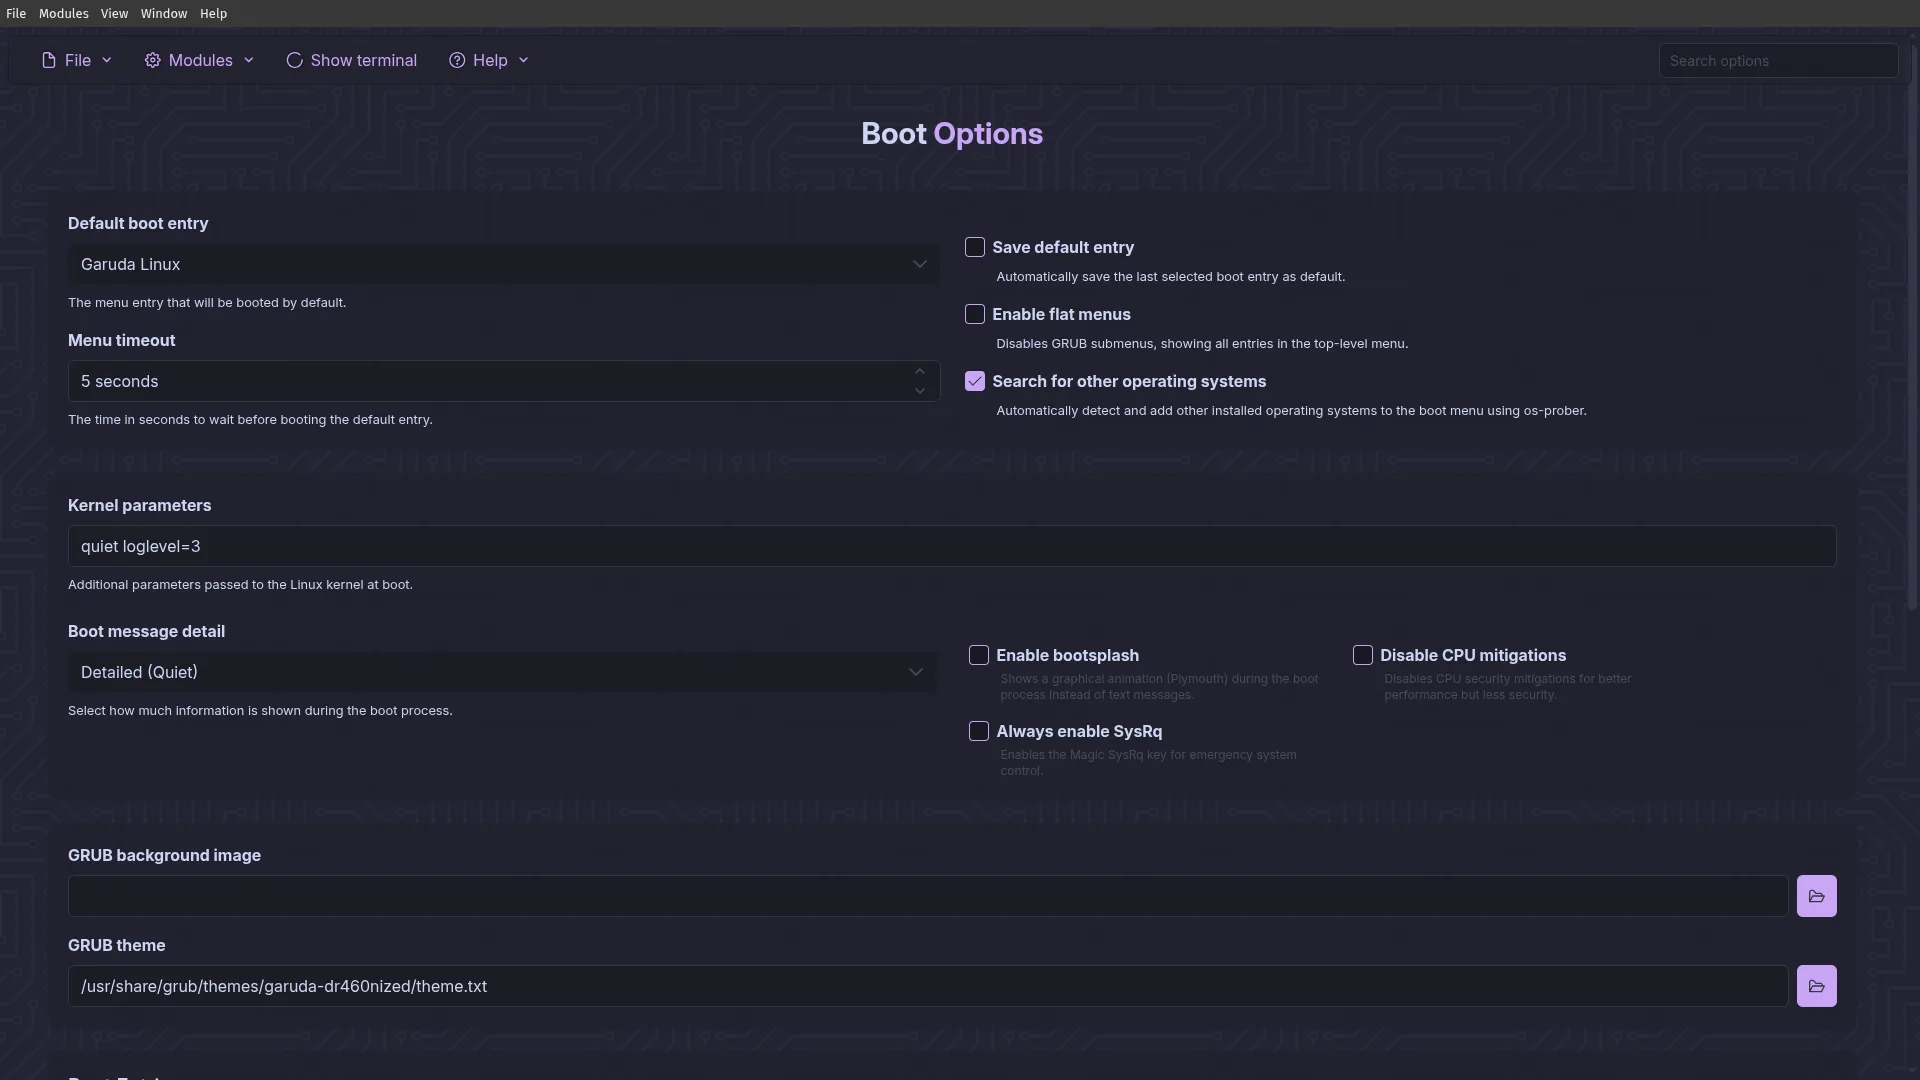
Here you can view and edit the following system’s boot options:
- Default boot entry and menu timeout
- Kernel parameters and boot message detail
- GRUB background image and theme
- Boot entries
Diagnostics
Section titled “Diagnostics”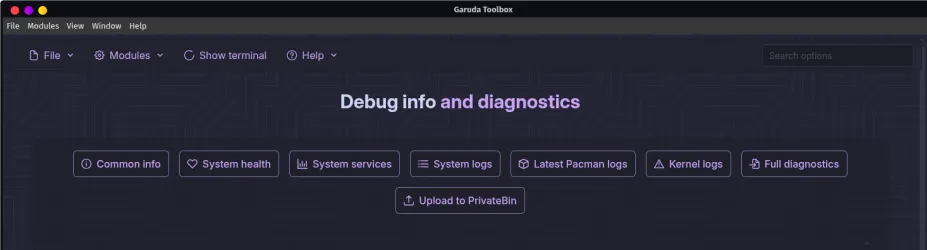
Here you can find important debug info and diagnostics to aid you in troubleshooting problems yourself or ask for help in the forum. For example:
- Common info provides detailed hardware and system information, which is basically the output of the garuda-inxi command. Make sure to provide it, when asking for help in the forum. 🫶
- System health lets you run a system health check and address potential issues
- System logs provides log entries from the journal daemon for the current session
- Upload to PrivateBin lets you use Garuda’s PrivateBin, a minimalist, open source online pastebin where the server has zero knowledge of stored data.
Network tools
Section titled “Network tools”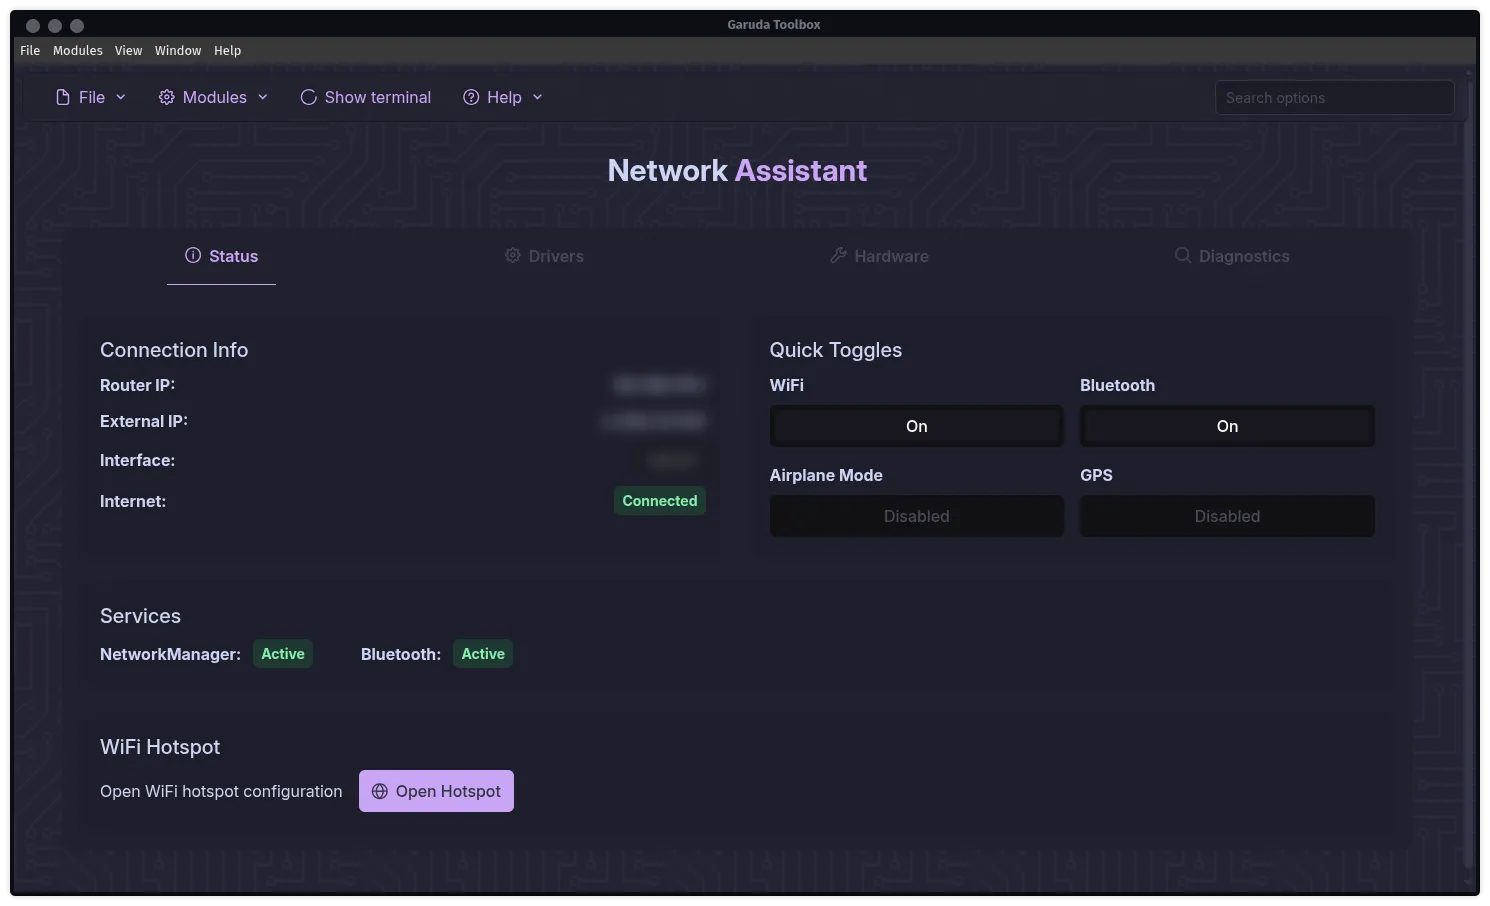
Here you can look up the status of your network as well as network related drivers and hardware. The tab “Diagnostics” provides graphical means to ping or traceroute a host.
Setup Assistant
Section titled “Setup Assistant”The Setup Assistant provides an easy way to select software you would like to install. It was introduced here.
Typing in Indic languages like Tamil
Section titled “Typing in Indic languages like Tamil”You can type in an Indic language such as Tamil on the default English (US) keyboard. You switch between the languages with a shortcut, so the normal layout stays available.
-
Open the Garuda Setup Assistant. In the input method category, select Indic (Devanagari, Tamil, etc.). This installs
fcitx5-m17nandfcitx5-configtool. -
Edit
/etc/locale.genas root. Remove the#in front of the lineta_IN.UTF-8 UTF-8. For Sri Lankan Tamil, also remove the#in front ofta_LK.UTF-8 UTF-8, which is the line directly below. -
Generate the locales with
sudo locale-gen. -
Reboot.
-
Open System Settings → Keyboard → Virtual Keyboard and check that Fcitx 5 Wayland Launcher is selected.
-
Open System Settings → Keyboard → Input Method and click Add Input Method. Search for
tamil, then addphonetic (M17N). -
Switch between English and Tamil with
Super + Space. To change this shortcut, open the Configure global options entry (the gear icon) in the same Input Method page.
Sample text typed with this setup: இனிய தமிழில் தட்டச்சு செய்து மகிழ்வீர். கருடா லினக்ஸ்-ஆல் இது கூடும். மிக்க நன்றி
Source: How to Type in Indic Languages like Tamil (தமிழ்) Based on Default Keyboard on the Garuda forum by kraza.
That concludes our tour of the Garuda apps. Have a good linuxperience! 😌
P.S.: I am really proud of you if you set up Garuda Linux for the first time. 😇